1. python
- 크롤링 : 웹에 접속하여 솎아내는 작업
- Venv 라이브러리가 실행 상태인지 확인 후 진행한다.

- pip install bs4(beautifulsoup4) 설치
Spartaprac 파일 선택하고 pip install bs4 + enter

- 크롤링 기본 format 코드
import requests
from bs4 import BeautifulSoup
headers = {'User-Agent' : 'Mozilla/5.0 (Windows NT 10.0; Win64; x64)AppleWebKit/537.36 (KHTML, like Gecko) Chrome/73.0.3683.86 Safari/537.36'}
data = requests.get('https://movie.naver.com/movie/sdb/rank/rmovie.naver?sel=pnt&date=20210829',headers=headers)
soup = BeautifulSoup(data.text, 'html.parser')
# 코딩 시작

- Select 복사

- <그린북> 요소만 가져온다.

import requests
from bs4 import BeautifulSoup
headers = {'User-Agent' : 'Mozilla/5.0 (Windows NT 10.0; Win64; x64)AppleWebKit/537.36 (KHTML, like Gecko) Chrome/73.0.3683.86 Safari/537.36'}
data = requests.get('https://movie.naver.com/movie/sdb/rank/rmovie.naver?sel=pnt&date=20210829',headers=headers)
soup = BeautifulSoup(data.text, 'html.parser')
# 코딩 시작
a = soup.select_one('#old_content > table > tbody > tr:nth-child(3) > td.title > div > a')
print(a)


- 그린북 텍스트만 가져오기

a = soup.select_one('#old_content > table > tbody > tr:nth-child(3) > td.title > div > a')
print(a.text)

- 그린북의 url만 복사하기

a = soup.select_one('#old_content > table > tbody > tr:nth-child(3) > td.title > div > a')
print(a['href'])

- 네이버 영화의 제목만 가져오기
영화 제목 → F12(검사) → 복사(copy) → selector 복사(selector copy)

영화제목 2~3개 selector copy 후 공통 값을 찾기
#old_content > table > tbody > tr:nth-child(3)
#old_content > table > tbody > tr:nth-child(4)
# 코딩 시작
#old_content > table > tbody > tr:nth-child(3)
#old_content > table > tbody > tr:nth-child(4)
trs = soup.select('#old_content > table > tbody > tr')
for tr in trs : #tr에서 하나씩 꺼내서 trs에 넣자
print(tr)

- 영화 제목만 가져오자
# 코딩 시작
#old_content > table > tbody > tr:nth-child(2) > td.title > div > a
trs = soup.select('#old_content > table > tbody > tr')
for tr in trs : # tr에서 하나씩 꺼내서 trs에 넣자
a = tr.select_one('td.title > div > a') # tr까지 가져왔으니까 td~a까지 가져와서 a에 담자
print(a)

None은 a태그를 찾았는데 a태그가 없을 때 none이라고 뜬다.

바(bar)도 tr태그로 만들었기 때문이다.

# a is not None, a != None : a가 None과 같지 않다.
# a is None, a == None : a가 none과 같다
trs = soup.select('#old_content > table > tbody > tr')
for tr in trs :
a = tr.select_one('td.title > div > a')
if a is not None :
print(a.text)

- 영화 페이지의 순위, 제목, 평점만 가져오자
아래 두가지는 똑같이 작동한다.
| # 코딩 시작 #old_content > table > tbody > tr:nth-child(2) > td.point #old_content > table > tbody > tr:nth-child(3) > td:nth-child(1) > img trs = soup.select('#old_content > table > tbody > tr') for tr in trs : a = tr.select_one('td.title > div > a') if a is not None : title = a.text rank = tr.select_one('td:nth-child(1) > img') print(rank['alt']) |
# 코딩 시작 #old_content > table > tbody > tr:nth-child(2) > td.point #old_content > table > tbody > tr:nth-child(3) > td:nth-child(1) > img trs = soup.select('#old_content > table > tbody > tr') for tr in trs : a = tr.select_one('td.title > div > a') if a is not None : title = a.text rank = tr.select_one('td:nth-child(1) > img')['alt'] print(rank) |

| # 코딩 시작 #old_content > table > tbody > tr:nth-child(2) > td.point #old_content > table > tbody > tr:nth-child(3) > td:nth-child(1) > img trs = soup.select('#old_content > table > tbody > tr') for tr in trs : a = tr.select_one('td.title > div > a') if a is not None : title = a.text rank = tr.select_one('td:nth-child(1) > img')['alt'] star = tr.select_one('td.point') print(star.text) |
# 코딩 시작 #old_content > table > tbody > tr:nth-child(2) > td.point #old_content > table > tbody > tr:nth-child(3) > td:nth-child(1) > img trs = soup.select('#old_content > table > tbody > tr') for tr in trs : a = tr.select_one('td.title > div > a') if a is not None : title = a.text rank = tr.select_one('td:nth-child(1) > img')['alt'] star = tr.select_one('td.point').text print(star) |

| # 코딩 시작 #old_content > table > tbody > tr:nth-child(2) > td.point #old_content > table > tbody > tr:nth-child(3) > td:nth-child(1) > img trs = soup.select('#old_content > table > tbody > tr') for tr in trs : a = tr.select_one('td.title > div > a') if a is not None : title = a.text rank = tr.select_one('td:nth-child(1) > img')['alt'] star = tr.select_one('td.point').text print(rank,title,star) |
# 코딩 시작 #old_content > table > tbody > tr:nth-child(2) > td.point #old_content > table > tbody > tr:nth-child(3) > td:nth-child(1) > img trs = soup.select('#old_content > table > tbody > tr') for tr in trs : a = tr.select_one('td.title > div > a') if a is not None : title = a.text rank = tr.select_one('td:nth-child(1) > img') star = tr.select_one('td.point') print(rank['alt'],title,star.text) |

2. DB 종류와 뜻
- DB란 저장한 데이터를 잘 가져오기 위한 것이다.
- SQL : RDBMS
틀(정해진 칸)에 정보를 넣는 것이다. / 대기업 용 등
- NoSQL : not only SQL (SQL 뿐만이 아니다.)
MongoDB 내 마음대로 저장하는 것 / 비즈니스 유연성에 편리함
(예) A : 이름, 연락처, 이메일
B : 이름, 연락처, 나이, 주소 - 창업할때에는 NoSQL로 사용하다가 기업이 커지면 SQL로 사용하기도 한다.


3. MongoDB 설치하기
- 내컴퓨터(python)과 MongoDB 연결하기
Pymongo 설치
pip install pymongo + enter

② dnspython 설치
pip install dnspython + enter

- Pymongo 기본 탬플릿
from pymongo import MongoClient
client = MongoClient('여기에 URL 입력')
db = client.dbsparta
Pymongo로 이동하여 Connect → connect your application을 누른다.

DRIVER : Python 선택
VERSION : 3.6 or later 선택
복사 버튼 선택
[Close]한다.

복사한 url을 붙여넣어준다.
from pymongo import MongoClient
client = MongoClient('mongodb+srv://sparta:<password>@yi12dada.jjhctyy.mongodb.net/?retryWrites=true&w=majority')
db = client.dbsparta
비밀번호 입력
from pymongo import MongoClient
client = MongoClient('mongodb+srv://sparta:test@yi12dada.jjhctyy.mongodb.net/?retryWrites=true&w=majority')
db = client.dbsparta
- Sparta DB에 딕셔너리 데이터 저장하기
아래 코드 입력 후 ctrl+save → '터미널에서 파이썬 실행하기'
from pymongo import MongoClient
client = MongoClient('mongodb+srv://sparta:test@yi12dada.jjhctyy.mongodb.net/?retryWrites=true&w=majority')
db = client.dbsparta
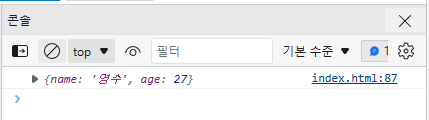
doc = {
'name' : '영수',
'age' : 24
}
db.users.insert_one(doc)
Python에서는 아무일도 일어나지 않는다.

아래와 같이 오류가 나는 경우 비밀번호에 <>가 포함되었기 때문이다..

MongoDB에서 Browse Collections를 클릭한다.

sparta dbspace안에 Users라는 소그룹이 생성되었다.

4. pymongo로 mongoDB 조작하기(요약코드)
- Pymongo 코드 요약
| 저장 | doc = {'name':'bobby','age':21} db.users.insert_one(doc) |
| 한 개 찾기 | all_users = list(db.users.find({},{'_id':False})) |
| 바꾸기 | db.users.update_one({'name':'bobby'},{'$set':{'age':19}}) |
| 지우기 | db.users.delete_one({'name':'bobby'}) |
- DB에 데이터 저장하기
from pymongo import MongoClient
client = MongoClient('mongodb+srv://sparta:test@yi12dada.jjhctyy.mongodb.net/?retryWrites=true&w=majority')
db = client.dbsparta
doc = {'name' : '영희','age' : 30}
db.users.insert_one(doc)
doc = {'name' : '철수','age' : 32}
db.users.insert_one(doc)
마우스 오른쪽 → 터미널에서 Python 파일실행
Python은 아무일도 일어나지 않는다.

REFRESH 해주면 영희, 철수 데이터가 추가된다.

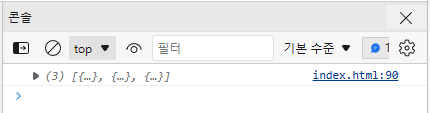
- Pymongo(find) 다 가져오기
| all_users = list(db.users.find({},{'_id':False})) |
{} : 조건
{'_id':False} : _id는 안보겠다.
from pymongo import MongoClient
client = MongoClient('mongodb+srv://sparta:test@yi12dada.jjhctyy.mongodb.net/?retryWrites=true&w=majority')
db = client.dbsparta
all_users = list(db.users.find({},{'_id':False}))
for a in all_users:
print(a)
모든 유저 정보를 list형태로 담자
all_users를 프린트하자

- 1개만 가져오기
| user = db.users.find_one({'name':'bobby'}) |
user = db.users.find_one({})
print(user)

- 데이터 변경하기
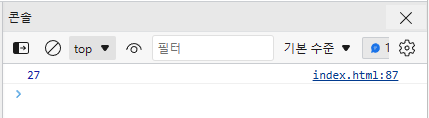
name이 '영수'를 찾아서 age를 19로 변경해라
| db.users.update_one({'name':'영수'},{'$set':{'age':19}}) |
from pymongo import MongoClient
client = MongoClient('mongodb+srv://sparta:test@yi12dada.jjhctyy.mongodb.net/?retryWrites=true&w=majority')
db = client.dbsparta
db.users.update_one({'name':'영수'},{'$set':{'age':19}})


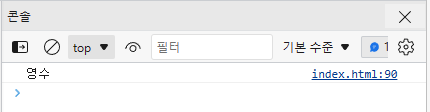
- 데이터 삭제하기
name이 '영수'인 데이터를 찾아서 삭제하라
| db.users.delete_one({'name':'영수'}) |

3주차 후기 : DB에 데이터까지 저장하다니!
너무 신기하고 재미있다 ㅎㅎ
단, 오타가 너무 심해서 진도가 안나간다 ㅎㅎㅎ
문법에 맞게 작성하고, 오타를 조심해야겠다
'BootChamp' 카테고리의 다른 글
| 웹개발종합반 1주차 개발일지 (0) | 2023.03.19 |
|---|---|
| 웹개발종합반2주차 개발일지 (0) | 2023.03.19 |

